Rarely, one of us does not dream of traveling ... About beautiful distant lands, geographical maps and guides remind us. Try to give them a romantic touch


Beautiful folds
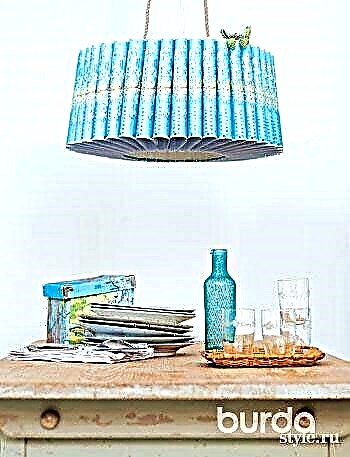
The lampshade in the photo will attract the attention of your guests not only with beautiful folds, but also with an interesting pattern, which is created very simply - using color copies of a single page of a geographic atlas.
YOU NEED: color copies of one sheet of a format card, A 4, a simple smooth cylindrical lampshade in white. Make sure that the height of the lampshade is equal to the sheets of copies. Glue stick, folding ruler, long ruler, pencil.
HOW TO MAKE: a lampshade is pasted over with approximately 40 copies of cards. For gluing, the sheets should be prepared as follows: on each sheet, form 2 tabs for gluing. To do this, wrap the short side of the copy on the back side 1 cm. Before this, mark the fold line with a pencil and a ruler. Fold using a ruler. Bend the tab along the bend so that it is at right angles to the copy sheet. Repeat the same on the opposite side of the copy sheet.
Then apply glue to the tongues and glue both sides of the copy sheet. After all the sheets of the copy of the card are thus prepared, they will need to be glued closely to each other on the lampshade. To do this, apply glue to the back of the reeds and press them against the lampshade. If necessary, fix with paper clips until the glue dries.
Tip: if the height of the lampshade is greater than the width of the sheet of paper, simply cut it from the bottom with a cutter.
Geography for geography
Cardboard boxes pasted with pages of geographical maps will serve to store both the guides and maps themselves, and various trifles necessary on the road.
YOU WILL NEED: color copies of geographical maps of format A 3, folding cardboard boxes of white color, wallpaper glue, carpentry glue, wide brush, soft cloth, knife-cutter, scissors.
HOW TO MAKE: paste cardboard boxes before folding them and paste over with color copies of cards. Prepare wallpaper glue according to the instructions on the package, leave over low heat so that it does not solidify. To better glue, glue a little wood glue. Glue the back of the color copies with glue. Glue to allow it to absorb a little, then put the paper on the boxes and smooth it with a dry brush or soft cloth with pressure from the center to the periphery. Carefully wipe the exposed adhesive. The protruding paper is also carefully cut with a cutter. Allow to dry completely. Then fold the boxes and, if necessary, fix with a stapler.

Frame collage
What could be more attractive than a souvenir brought from a distant country?You can easily assemble an individual decorative collage from materialized memories yourself, thanks to our idea: paste the bottom of the old box with different photos and place your favorite souvenirs on it and on it.

Seasoned traveler
It’s even a pity to take such a suitcase with you on the road, because it has turned into a symbol of unforgettable impressions, a living reminder of numerous trips. To make such a unique one is quite simple: paint the old suitcase with white paint and paste over with postage stamps, embroidery, photographs, etc.
YOU WILL NEED: old postage stamps or their copies, old suitcase, calico, red thread for embroidery, the remains of volumefliz, film for t-shirts, pencil for painting fabrics, white acrylic paint, transparent acrylic matte varnish, spray glue, wallpaper glue, wood glue , roller and bath for painting, brush, needle for embroidery with a sharp tip, scissors.
HOW TO MAKE: First clean the suitcase with a brush. Then a little sanding the surface to make it slightly rough, while removing peeling paint and, if necessary, split fibers. Remove all dust formed by wiping the suitcase with a cloth.
When the suitcase is completely dry, paint it white.To keep the paint flat, take some paint onto the brush. Color the suitcase twice. Paint large, even surfaces with a roller. Corners, edges and small surfaces - with a brush. Allow the paint to dry completely.
Prepare wallpaper glue according to the instructions on the packaging, put on low heat so that it does not freeze. To better glue the glue, add a little carpentry to the wallpaper glue. Cover the sides of the suitcase with postage stamps or their copies. To do this, smear wallpaper glue on the back of the brand, let the glue soak a little, then apply the brand to the surface of the suitcase, with a dry brush, press it from the center to the periphery, smoothing the surface of the brand. Glue gently at the edges and gently wipe off with a soft cloth.
Decorate the lid of the suitcase with a postcard from calico. To do this, cut the calico to the size of the lid of the suitcase. With red thread for embroidery, embroider the “forward needle” of the line for the address with stitches. Write the address with a marker for painting on fabric.
For a postage stamp, scan or print any motive on the printer. According to the manufacturer’s instructions in a mirror image, print on a T-shirt film, cut with large allowances and iron on a piece of calico. Cut the motive with allowances in a circle 1 cm wide. Cut a piece of volumefliz to the size of the mark. Place the Volumerflise under the “stamp”, then lay the stamp with the volumeflyz on the embroidered piece of calico, pin and stitch with a seam width of 1 cm. Stamp motif, as described above, print on a T-shirt film and iron on a piece of calico. Cut the motive, place it on a postcard, pin it and sew it with a tight zigzag.
Finally, sprinkle the back of the postcard with glue, then put it on the lid of the suitcase and smooth it from the center to the periphery.

Permanent travel companion
You can not write down your impressions during the trip? Then make your diary of observations a fabric cover with postage stamps, stamps, maps, photographs ...
YOU WILL NEED: a notebook, calico, old postage stamps or color copies of them, motifs of postage stamps, ironing stickers, motifs of geographical maps, a film for transferring motifs to t-shirts, binding glue, a marker with disappearing paint, a brush, scissors.
HOW TO MAKE: First, cut out the cover for the notebook from the calico. To do this, open the book wide open, put it on calico and draw a contour of the book with a marker with disappearing paint, while marking the location of the book spine. Around give 3 cm of allowances, and cut out the cover. Cover the cover with a geographic map motif. To do this, scan the motive, print the photo according to the manufacturer’s instructions in a mirror image on a film for T-shirts. Cut the motif precisely along the contour and iron it on the cover. In the same way, scan and use the film to iron the motives of postage stamps and stamps.
If desired, decorate the spine of the book with ironing stickers or stamp motifs. Then cut the allowances on the spine, wrap on the wrong side, if necessary, fix a drop of binding glue. Now grease the underside of the decorative cover with glue.
Stick the cover on the closed book first. Then open the book and stick the allowances on the inside of the cover. At the end, cut 2 pieces of calico for the inner side of the cover, grease it with glue from the wrong side and stick it on the inner sides of the cover, tucking the allowances, while closing the allowances of the upper side of the cover.

All corners of the world
The bench is covered with pages of the world atlas - the whole world fit on it! It is best to stick the pages of the atlas with a mixture of wallpaper and carpentry glue.
YOU NEED: color copies of various maps in the format, A 3, an old bench or stool, white acrylic paint, transparent acrylic matte varnish, wallpaper glue, carpentry glue, sandpaper, knife cutter, scissors. A wide brush, roller and bath for painting.
HOW TO MAKE: First brush the bench. Sand the surface slightly with sandpaper so that it becomes a little rough, while removing peeling paint and wood fibers. After that, wash off the dust thoroughly with a damp cloth and allow the bench to dry.
To paint lay evenly, take a little paint on the brush. Cover the bench with two coats of paint. Paint large surfaces with a roller; corners, edges and bottlenecks - with a brush. When the paint dries, paste the bench around with colored copies. To do this, prepare wallpaper glue according to the manufacturer's instructions and put it on low heat so that it does not freeze. In order to better glue the glue, add a little wood glue to it and mix.
Color copies cut into squares and rectangles. Lubricate the back of colored copies with glue. I glue to let it soak for a while, then put the paper on the bench and smooth it with a dry brush with pressure from the center to the periphery. Wipe off any glue that has come out. Rectangles and squares of color copies should overlap.
Allow the work to dry completely and, at the end, completely cover the bench with clear varnish.

Dream come true
Here you can dream about long journeys, basking on soft pillows. Applications can be additionally decorated with embroidery, buttons, etc.
YOU WILL LIKE: calico, zipper, colored flaps of fabric, woolen or embroidery threads, matching in color or contrast, linen buttons or contour for painting fabric, fleece fix, cotton wool for packing or ready-made stuffing, sewing threads, needle for embroidery with sharp tip, pencil, scissors.
HOW TO MAKE: Wash calico, dry and iron calico. For each pillowcase for the front and back side, cut out two pieces of the desired size. At the same time, give 1 cm of allowances around, at the bottom edge give 2.5 cm of allowances for attaching the zipper. For the application, copy the contours of any continent onto transparent paper. If necessary, increase or decrease motives using a photocopier.
Copy the motif in the mirror image to the paper side of the flizofiksa. Cut motif with large allowances and iron on the wrong side of the colored fabric. Cut the motif exactly along the contour and remove the transfer paper.
The motive of the continent is located on the front side of the pillow, ironed and then additionally stitched in a tight zigzag. Cities, rivers, etc., if desired, marked with buttons or marker for painting on fabric. The contours of the continent can be repeated with large stitches of woolen or embroidery threads (see photo).
Fold the two parts of the pillow face to face and grind the lower sections first with 2.5 cm wide allowances, while leaving a hole in the middle of the seam for attaching the zipper. Under the seam allowances to grind and open. After this, grind the remaining slices with allowances 1 cm wide.
Unscrew the pillow, stretch the corners, iron the seams. At the end, put a pad or cotton and fasten the zipper.

World mobile
This mobile will become a spectacular decoration of the room. Circles can be made as follows: make color copies of the atlas of the world, and then stick them on both sides on cardboard circles.
YOU WILL NEED: color copies of any geographical maps of the format, A 3, it is best if they are copies on fairly thick glossy paper, sewing threads in turquoise color, a kitchen grill as a base for attaching, a batch cord, a circle cutter, glue with a spray scissors.
HOW TO MAKE: the mobile consists of 22 chains of 12 circles, in total you will need 44 color copies of the format, A 3.
Using glue-spray, glue 2 copies of the wrong side to the wrong side and allow to dry. Then cut the circles. From each sheet of format A 3, 12 circles of dia are obtained. 9 cm each, a total of 132 circles.
12 circles with a sewing machine to connect in a chain. To do this, stitch one circle in the middle, then, without interrupting the thread, scribble further so that the upper and lower threads are intertwined.
After a twisted thread of approx. 9 cm, put the next circle and stitch as described above. Continue until 12 circles are connected to each other in the same chain. To fix the chain, leave the long upper and lower threads.
The finished chains are knotted to a twisted kitchen grid, while making sure that the circles hang at different heights. Cut excess threads.
For hanging, cut off 4 equal lengths of the packet cord and tie at equal intervals with knots on the kitchen grid. Tie these four cords of the required length together with a knot, hang the mobile.
Photo: Christine Bauer, design and manufacture: Claudia Risland and Dagmar Murkudis.